

How To Prevent Wood Furniture From Cracking
We build our DIY article of furniture projects with wood, just do we actually empathise how wood works? If nosotros build without taking into consideration the seasonal movement of woods, our projects volition crack and split.
If nosotros build using proper techniques, our projects will become family unit heirlooms. Today I'm sharing how you tin can exist a better architect, preclude your woods furniture from cracking and ensure your projects volition last a lifetime.
This tutorial contains affiliate links to supplies and tools. Purchases made using these links help back up the Saws on Skates website and allows me to share more than projects and tips with you. At that place is no cost to you for using these links. Visit my site policies for more information.
A few weeks agone, I shared my 9 Pocket Hole Mistakes You Don't Want to Brand. I received lots of feedback that the information was helpful. By the style, thanks for the feedback – I honey hearing from you!
In add-on to discussing possible pocket hole mistakes, I also touched on woods is a living thing and that seasonal changes cause movement. From the feedback, I could tell I needed to swoop a piffling deeper into the movement of forest, what causes wood to crack, and share some DIY furniture construction tips.
Wood is a Living Thing
Wood is a living thing. Look, did I just say wood is a living affair?! Well, non exactly living, but it is hygroscopic. Await, did I but say hygroscopic – what's that? Only put, hygroscopic ways it absorbs moisture from the air.
Forest is constantly absorbing and releasing wet, just as it did when it was a tree growing in the ground.
The grain or fibers of woods run the length of a lath. Before a tree becomes a slice of lumber, the tree's roots would drink h2o, and that water traveled through these fibers.
The all-time way to think of those wood fibers is like a box of drinking straws. When the tree becomes a piece of lumber, information technology still "drinks" h2o. Instead of drinking h2o through the roots, wet is captivated by all exposed surfaces of the wood into those drinking straws or wood fibers.
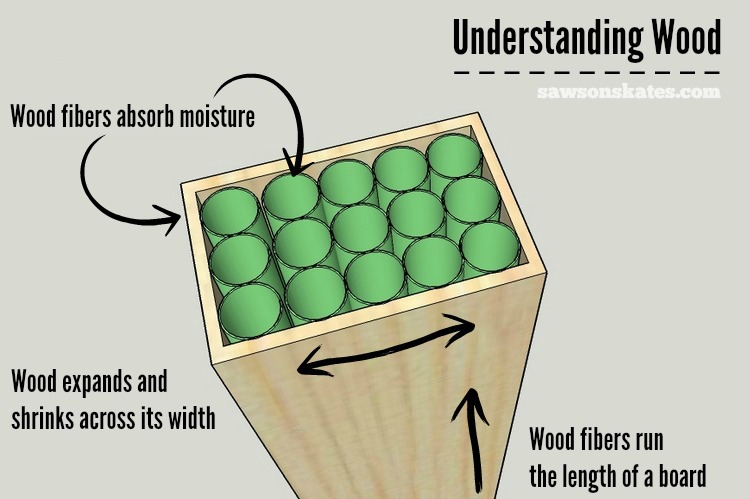
When information technology's more boiling, the drinking straws, ummm forest fibers, absorb moisture, then the wood swells and gets bigger. When it'due south less humid, the wood releases wet, and so it shrinks and gets smaller.
If you build a furniture project when it'due south humid, you lot may notice when the air is drier that some of the joints don't fit as well every bit they did when there was more than wet in the air.
Why Woods Cracks
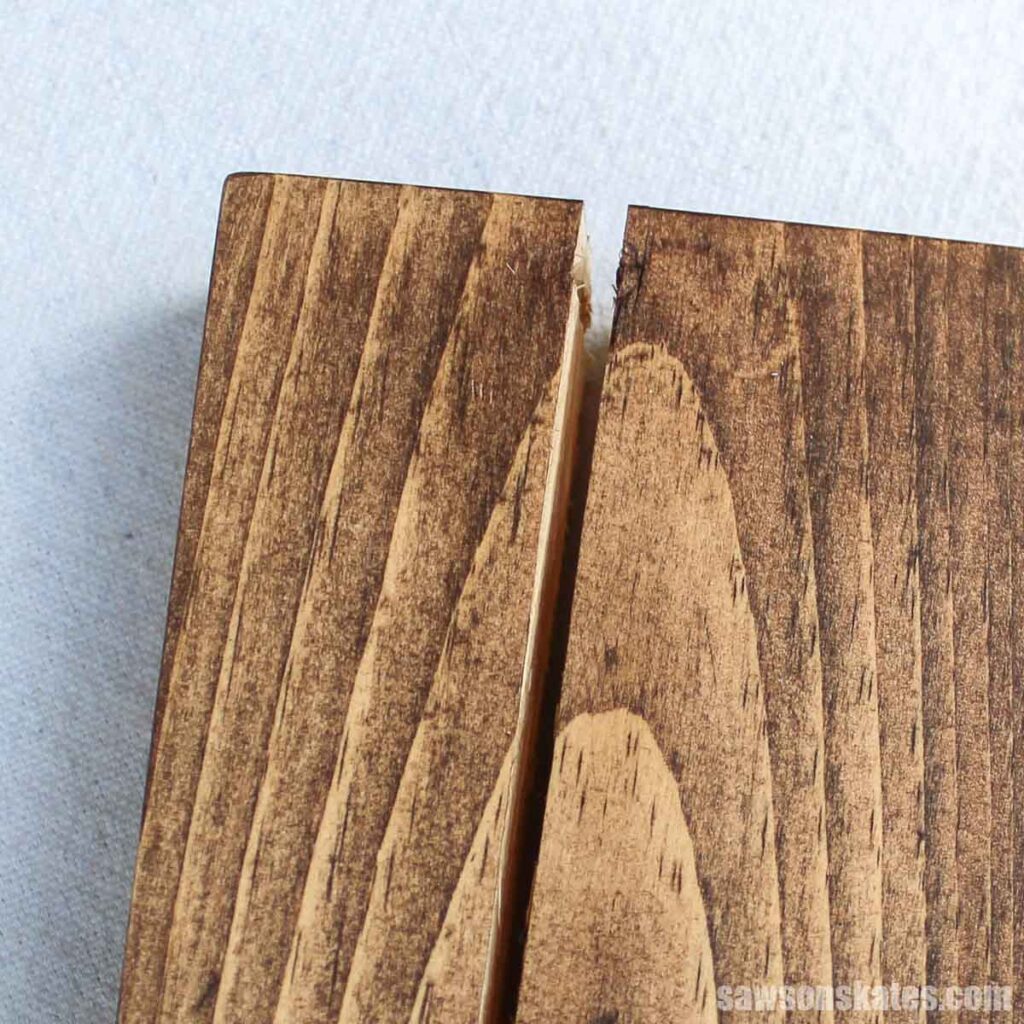
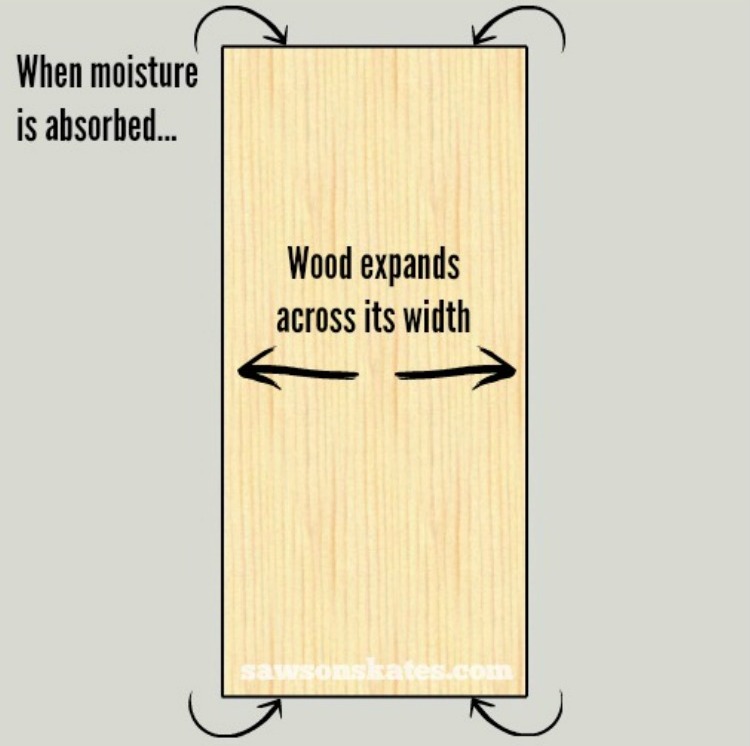
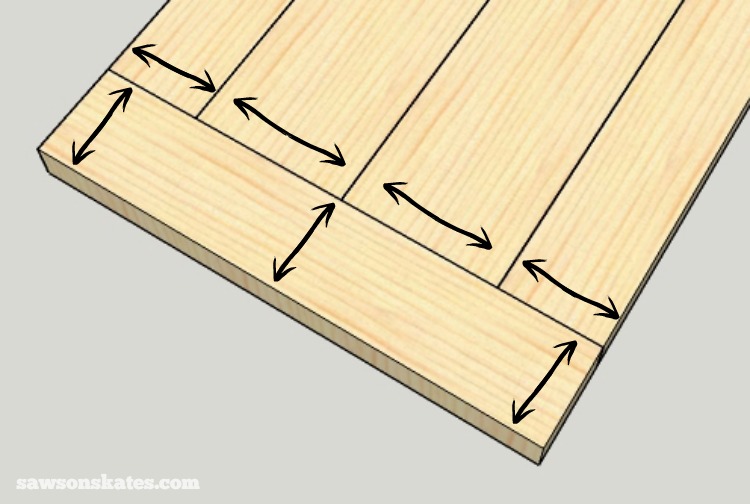
The continuous swelling and shrinking motility of wood can crusade some issues. When it's more boiling, the moisture in the air is absorbed by those drinking straws or woods fibers, and the wood swells.
The swelling occurs the most across the width of a board and actually has enough force to pull joints apart. Worse nevertheless, if the wood is joined improperly, it tin can crusade the wood to crevice and divide.
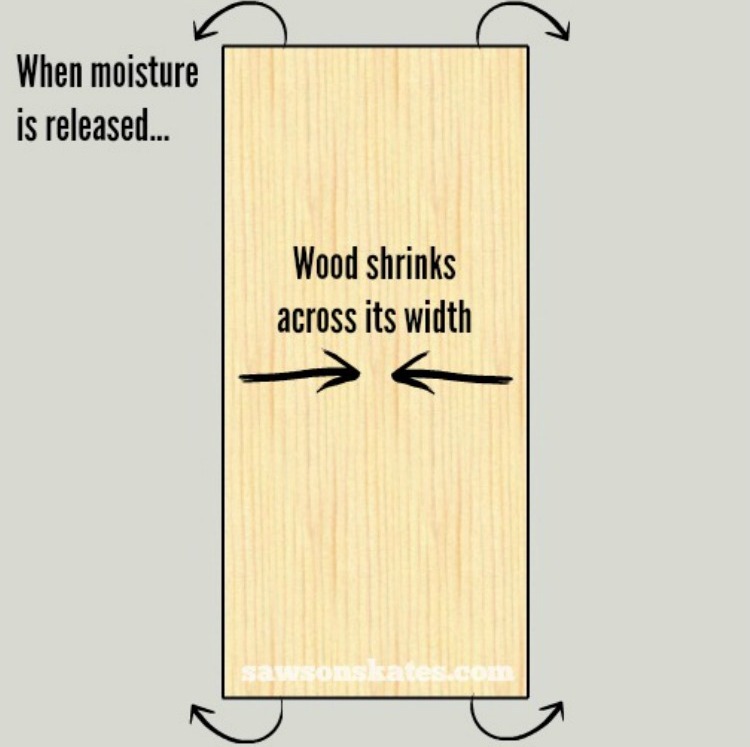
When it's less humid, moisture is released by those drinking straws or wood fibers, and the woods shrinks. The shrinking occurs the most across the lath's width and actually has enough strength to pull joints autonomously. Worse yet, if the wood is joined improperly, it tin can cause the wood to crack and split.
Understanding Wood
Equally DIYers, we demand to sympathize and account for this persistent swelling and shrinking motion of woods to create furniture projects that will last. Accounting for that movement means understanding some ground rules when working with wood.
- Nosotros cannot end wood from moving. Every bit I mentioned before, instead of drinking water through the roots, moisture is absorbed by those drinking straws or wood fibers. There is no way to finish this process. It's a fact that we have to understand and have.
- Nosotros cannot limit the movement of forest. Trying to limit or foreclose the wood from moving will make the wood Crevice! Permit'south say y'all make a frame from 2×4s and a panel to fit within that frame from 1×4s. To attach the panel to the frame, you utilize your Kreg Jig to drill pocket holes effectually the edges of the panel. You lot apply glue to the edges of the panel, insert it into the frame and adhere it to the frame. This sounds OK, correct? Wrong! This associates limits or prevents the console from moving.
Let'south take a closer look at our case from above. The panel described to a higher place is "trapped" within the frame and doesn't let for the wood'south normal swelling and shrinking motility.
Think, every bit the panel absorbs moisture, the 1×4s of the panel volition aggrandize side to side. Because the panel is fastened to the frame with pocket screws, the sideways expansion could crack the panel. It could as well push the frame'southward joints apart, leaving a gap betwixt the rails and stiles.
We'll wait at some alternatives for installing panels a scrap afterwards in this article.
Finishing Wood
To help the woods blot and release moisture more than evenly, it's a skillful idea to utilize a finish to all surfaces including, the outside, inside, and underside of your project.
Just imagine sealing one side of a board simply not the other. The raw side of the board would absorb and release moisture more rapidly than the sealed side. Absorbing and releasing wet at different rates could cause the board to cleft over time.
If I'm going to employ an oil-based woods stain, first, I apply a homemade woods conditioner like blackness tea. Using tea helps forbid blotchiness and gives my DIY furniture projects a rich, uniform colour when the forest stain is applied.
Related: What I Use Instead of Forest Conditioner
Joints Prone to Smashing
Now that we sympathize wood movement and why wood cracks, it's important to recognize the types of joints prone to cracking when edifice or designing DIY furniture. Here are four popular joints that could crack over time.
Cantankerous-Grain
A cantankerous-grain joint is where pieces of wood are fastened perpendicular to each other.
Here's an case. To mount drawer slides in this nightstand, I needed to attach a brace front to back on the side panels.
Related: How to Build DIY Drawers
If I were to gum and spiral a 1×4 brace on the side console, the assembly would move in different directions. The side would move side to side while the caryatid would move top to bottom. This unlike movement could fissure the wood over fourth dimension.
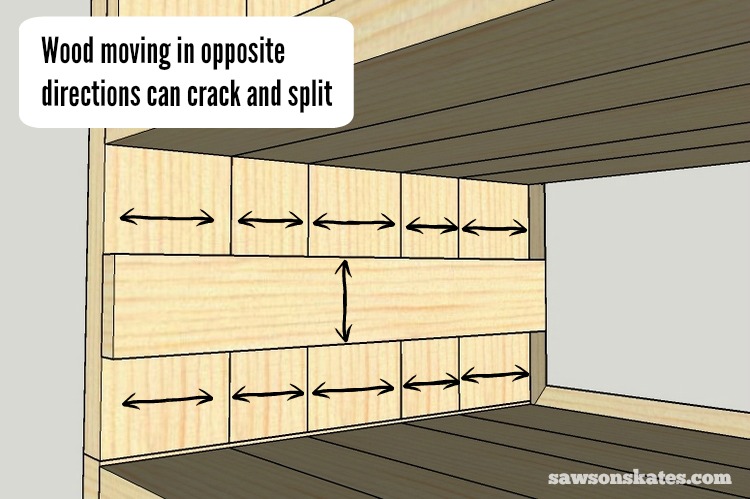
It'southward best to avert a cross-grain joint, but if you lot can't, don't mucilage the joint. This volition at least allow for a bit of movement.
For my nightstand project, I glued up a caryatid from several pieces of woods to match the direction of the woods on the side panels. It's a piddling more time-consuming, but this way, the side and the brace will motion in the same direction.

Panels
Before in this article, we fastened a console made of ane×4s to a frame fabricated from ii×4s with pocket hole screws. We saw how the frame prevented the panel from moving with seasonal changes, which could cause the wood to split or crack.
A better method for building an associates similar this is with frame-and-panel construction.
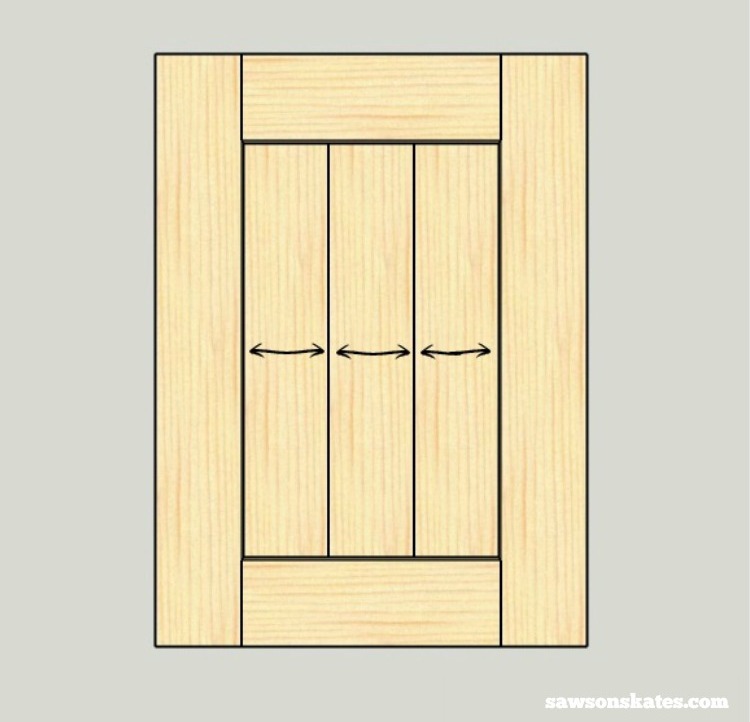
Cabinets and furniture are oftentimes constructed using frame-and-panel a construction, which involves a wooden frame with a wood panel in the eye.
The console floats in a groove cut into the frame, allowing information technology to expand and contract with seasonal changes. This is a common structure technique used in Shaker-style chiffonier doors.
Related: How to Build DIY Shaker Cabinet Doors
Let'south think near our 2×four frame and ane×4 panel example again. This time we'll assume you don't have a router to make a groove for the panel. In this example, you could utilize a plywood panel instead.
Related: How to Use a Router Table for Beginners
Plywood is made using many sparse layers of wood glued together in a cross-grain design. Earlier, we covered how cross-grain joints are prone to bully, just moisture absorption isn't much of an result because the plywood sheets are so thin. Compared to solid wood, plywood inappreciably moves with seasonal changes.
To reduce the chances of peachy, yous could bandy the 1×four panel with a plywood panel. Plywood would virtually eliminate side-to-side movement caused by the panel. The parts of the frame, on the other hand, would continue to movement, so while this assembly has a decreased risk of nifty, information technology is nonetheless a possibility.
Tabular array Tops
One of the common mistakes DIYers make is to attach a table top in a way that prevents it from moving with seasonal changes. I've never had a tabular array top scissure, just I am guilty of attaching tops incorrectly.
Let's look at how I attached the elevation to this pace stool incorrectly. When I first built the stool, I drilled pocket holes through the aprons and used pocket pigsty screws to adhere the superlative of the stool.
Table aprons are pieces of forest that run perpendicular to the tabular array top and connect the legs of a table. Aprons help strengthen the tabular array and provide support for attaching the tabletop to the legs.
Attaching a table top to the aprons with pocket hole screws is incorrect because it prevents the top from shrinking and swelling along with changes in humidity and temperature.
The top of the tabular array may crack with time, or the top might take enough forcefulness to push or pull the base'south joints apart.

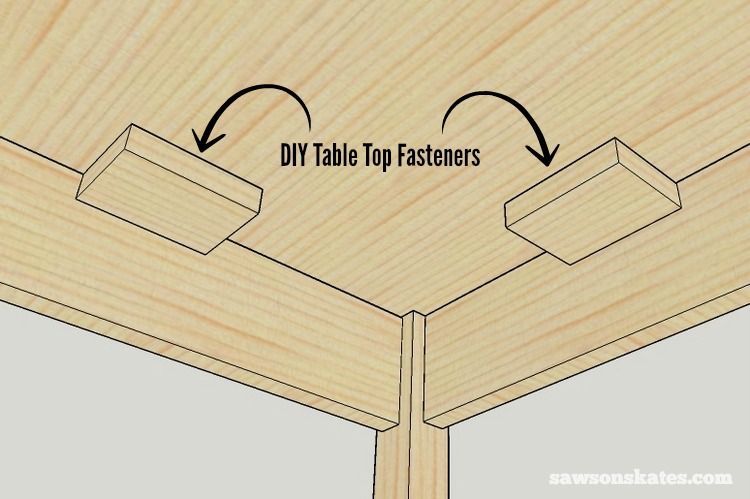
A improve choice for attaching table tops to aprons is with table top fasteners. Tabular array meridian fasteners attach to the underside of a tabular array top and the aprons and allow the height to expand and contract.
Figure eight, "Z" fastener clips, and expansion braces are just a few of the table top fasteners available.
Related: How to Attach a Table Top to a Base (The Right Way)
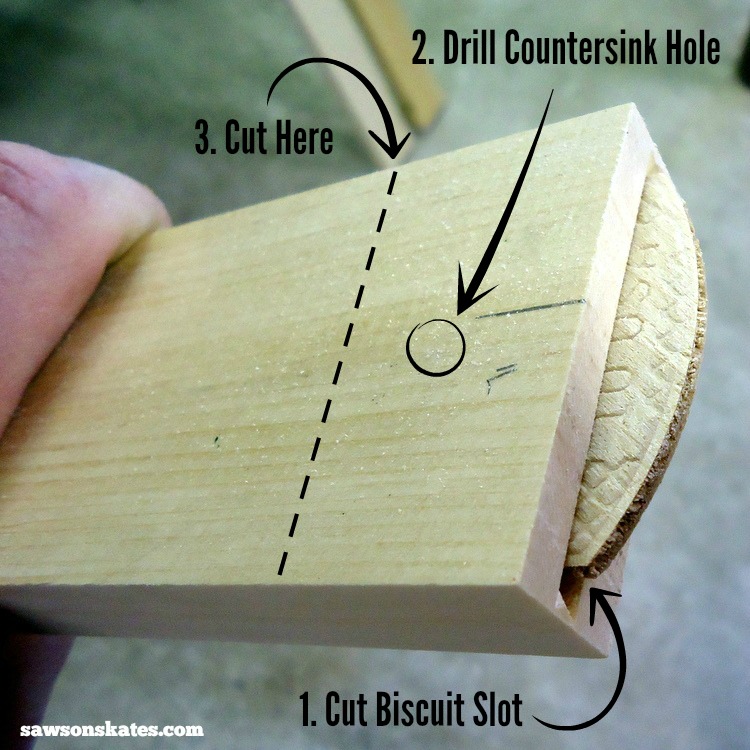
You lot tin also make your own tabular array top fasteners using a biscuit joiner. Showtime, cut a biscuit slot into a piece of wood like a 1×three, drill a countersink hole, and cut the piece to length.
Related: How to Utilize a Countersink Bit
📝 Annotation: The image below is just a demonstration. It'southward actually easier to cutting several biscuit slots in the side of the board (rather than the terminate), drill a countersink hole backside each slot, and then cut into individual pieces.
Cut several beige slots into the aprons. And then slide a biscuit into the frock, place a DIY table height fastener over the biscuit and attach it to the table top with a spiral.
If it's not possible to adhere your tabular array top to the aprons, as was the instance with this vino chiffonier and apothecary cabinet, attempt this. I drilled oversized holes in the acme braces. And so through the holes, I attached the summit with washers and screws. The large holes let the acme to move freely while the washers keep the screws from falling into the holes.
Breadboard Ends
Breadboard ends are a cute mode to terminate a tabular array top, but they create a cross-grain situation which we've learned is prone to cracking. When breadboard ends are attached to a table top with pocket hole screws, it's usually just a matter of time before the wood splits.
I collaborated with my buddy Mike from Kreg Tool to create a simple solution for practise-it-yourselfers who want to attach breadboard ends with pocket pigsty joinery. OK, I'll confess, except for a couple of ideas, the design was mostly his!
Related: DIY Farmhouse Table Peak Plans (with Breadboard Ends)
Last Thoughts
It's critical to sympathize how wood works and consider the seasonal movement of wood for united states to exist meliorate DIYers. Edifice with proper techniques will reduce the chances of our article of furniture cracking and ensure our projects volition last a lifetime.
Thank yous for stopping by. If you enjoyed this tutorial, would y'all please accept a moment and pivot it to Pinterest? I'd really appreciate it!
Pin This For Later
Source: https://sawsonskates.com/wood-mistakes-cause-cracking/
0 Response to "How To Prevent Wood Furniture From Cracking"
Post a Comment